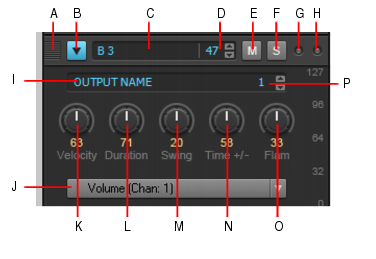
Table of Contents Previous Next Index


Figure 513. Per-row controls
A. Drag to reorder rows B. Select row (and show Controllers pane) C. Note name (click to audition pitch) D. Note number E. Mute F. Solo G. Incoming MIDI activity indicator H. Shared MIDI channel indicator I. Output J. Step Editor parameter (Event Type picker) K. Velocity L. Duration M. Swing N. Time offset O. Flam P. Output channel
Each row represents a specific pitch. Similar to the Drum Editor in the Piano Roll view (in some ways, you can think of a row as a different way of looking at the Drum Map Manager in MIDI - Drum Map Manager (Advanced)), the controls for each row are located at the left side of the row.
To expose all controls, click a row’s Select button. Each row has the following controls:
list-image
Select. Use this button to expose advanced parameters and select the row or rows you want to edit in the Controllers pane. If multiple rows are selected, the Controllers pane is displayed below the top-most selected row. The Controllers pane is hidden if no rows are selected. See To select rows, To edit controller events on a single row and To edit controller events on multiple rows simultaneously.
list-image
Note Name. This control shows the name of the note to which the row is mapped. Click the note name to audition the pitch. To rename the note, right-click the row and select Rename Note from the pop-up menu.
list-image
Note Number. Use this control to specify the row’s input note.
list-image
Mute. This button mutes the row/note/pitch.
list-image
Solo. This button solos the row/note/pitch.
list-image
Incoming MIDI activity indicator. This indicator lights up if the row is receiving MIDI input.
list-image
Shared MIDI channel indicator. This indicator lights up if a selected row shares the same MIDI channel as any other row. This is a convenient reminder that any controller events you insert in the row will also affect all other rows that share the same MIDI channel.
list-image
Output. Use this control to assign all selected rows to any available software instrument or drum map. You can also access the Map Properties dialog box from the drop-down menu. By default, each row is assigned to the track’s output. If you assign different rows to different outputs, the step sequencer will automatically assign the rows to a new drum map (see Using the Step Sequencer with drum maps).
list-image
Channel. Use this control to specify the output channel for all selected rows.
list-image
Velocity. Use this control to apply a velocity offset to a pitch. The value range is -127 to +127 and the default value is 0.
list-image
Duration. The Duration knob controls how long each note is held. The value range is 0 to 100% and the default value is 100% (hold each note for its full duration).
list-image
Swing. The Swing knob controls the amount of swing that is applied to the sequence. The value range is 0 to 100% and the default value is 50% (no swing).
The default swing value of 50% means that the beats are spaced evenly. A value of 66% means that the time between the first and second beats is twice as long as the time between the second and third beats.
list-image
Time offset. This knob lets you apply a time offset to all steps in a row. This is very useful for fine-tuning the rhythm of a pattern. The value range is -50% to 50% and the default value is 50% (no swing).
list-image
Flam. This knob lets you adjust the timing of any flammed notes. A flam is a quiet “grace” note that is added to the beginning of a louder “primary” note, resulting in a fuller sounding note when played almost simultaneously. The value range is -50% to 50%. With a value of 50%, the flam is hit exactly in the middle of the step. See To add/remove a flam.
list-image
Insert Row. Click to insert a new row. For details, see To insert a row.
list-image
Delete Row. Click to delete a row. For details, see To delete a row.
list-image
Cut Row Steps. Click to cut a row’s steps. The cut steps are placed on the Clipboard and can be pasted into another row. For details, see To cut/copy/paste all notes in a row.
list-image
Copy Row Steps. Click to copy a row’s steps. The copied steps are placed on the Clipboard and can be pasted into another row. For details, see To cut/copy/paste all notes in a row.
list-image
Paste Row Steps. Click to paste the Clipboard contents to a row. For details, see To cut/copy/paste all notes in a row.
list-image
Shift Steps Forward. Click to move all notes in a row to the right by one step. For details, see To shift all notes in a row to the left or right.
list-image
Shift Steps Backward. Click to move all notes in a row to the left by one step. For details, see To shift all notes in a row to the left or right.
list-image
Velocity Multiplier. This command lets you specify a level of compression or expansion for a pitch. The value range is 0.10 - 2.00 and the default value is 1.00 (no compression or expansion). A value below 1.00 is compression and a value above 1.00 is expansion. For details, see To compress or expand all note velocities in a row.
list-image
Rename Row. This command lets you rename a row.
list-image
Fill Every > 2-6. This command lets you automatically insert notes every, 2, 3, 4, 5, or 6 steps. For details, see To automatically enable notes every “n” steps.

Copyright © 2024 Cakewalk, Inc. All rights reserved
Sitemap | Privacy Policy | Legal